
You do not need oil to cook food that tastes good and has good texture. In most home kitchens, 8 simple methods cover almost everything: steaming, poaching, roasting on parchment, dry sautéing with water or broth, baking with moist substitutes, air frying, grilling, and using nonstick or seasoned pans.
Here’s the short version:
- Use moist heat for tender results: steaming and poaching
- Use dry heat for browning and crisp edges: roasting, air frying, and grilling
- Use the right pan to cut sticking: nonstick, cast iron, or stainless steel
- Preheat first, leave space between pieces, and add lemon juice or vinegar at the end for more flavor
- Oil is calorie-dense: 1 tablespoon has about 120 calories, so cutting added oil can lower the total fast
If I want oil-free cooking to work on a weeknight, I focus on three things:
- Heat
- Moisture
- Timing
That’s the whole idea behind this article. It shows which method fits which food, what mistakes to avoid, and how to combine methods for meals that are tender inside, browned outside, and not bland.
| Method | Best use | Main result |
|---|---|---|
| Steaming | Green vegetables | Tender-crisp |
| Poaching | Fish, eggs, chicken breast | Moist and soft |
| Roasting on parchment | Potatoes, Brussels sprouts, tofu | Browned edges |
| Dry sautéing | Onions, zucchini, carrots | Soft with light browning |
| Baking with substitutes | Muffins, cakes, quick breads | Moist texture |
| Air frying | Potatoes, tofu, falafel | Crisp outside |
| Grilling | Salmon, chicken thighs, peppers | Char and firm texture |
| Nonstick or seasoned pans | Eggs, fish, tofu | Cleaner release |
Bottom line: if I match the food to the cooking method instead of reaching for oil by default, cooking gets simpler and the results get better.
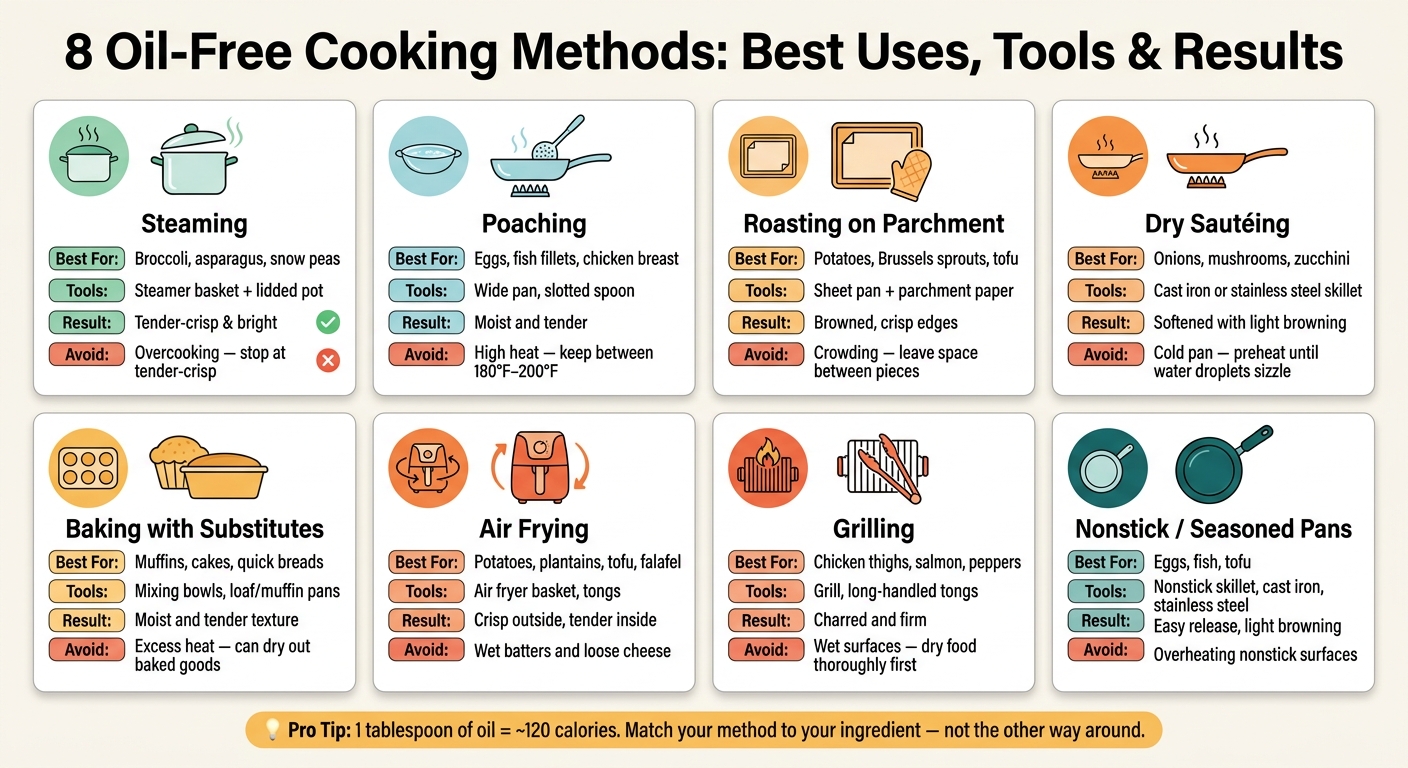
8 Oil-Free Cooking Methods: Best Uses, Tools & Results
How to Cook With NO OIL – Easy Cooking Basics + Life Hacks!
Why Home Cooks Should Use Less Oil
The most direct reason to use less added oil is calorie control. Oil packs a lot of calories into a small amount, so even a light pour can change the total fast. If you swap in moisture-rich ingredients, you can keep food tender and pleasant to eat while cutting back on extra calories. For a lot of home cooks, that shift makes the biggest difference in weeknight meals.
Some people also cut added oil for heart-health reasons. The good news? It can work well in a home kitchen if you pay attention to heat, moisture, and cookware. That’s the whole game. Once those pieces are in place, cooking without added oil feels much less like a compromise and more like a smart kitchen habit.
And this isn’t limited to one niche method. Common kitchen setups already support it. Oven roasting, stovetop sautéing, baking, grilling, and air frying can all work without added oil. Next: the core oil-free methods.
What to Know Before You Start Cooking Without Oil
Before you get into the different methods, a few basics make oil-free cooking much easier.
Preheat pans all the way before adding food. On stainless steel, use the water-droplet test: if a drop sizzles and evaporates in a few seconds, the pan is ready. Skip this, and sticking becomes much more likely.
Don’t overcrowd pans or sheet pans. Too much food in one spot traps steam and gets in the way of browning. Give ingredients some space, whether you’re roasting vegetables or cooking in a skillet. If you’re making a big batch, cook in two rounds.
Season generously. Use half as much table salt as kosher salt, then finish with lemon juice or vinegar to make flavors pop.
Choose the right surface for the job. Heavy-bottomed cookware, like cast iron or stainless steel, helps keep heat steady. Here’s a quick breakdown of the tools that help most:
| Tool | Best Use in Oil-Free Cooking |
|---|---|
| Cast iron pan | Searing and stovetop-to-oven cooking |
| Stainless steel skillet | High-heat searing and building fond for pan sauces |
| Rimmed half-sheet pan + parchment paper or silicone mat | Oven roasting without sticking or grease |
| Dutch oven | Oven-based "no-stir" grains and moisture retention |
Use this tool list to match the method that fits the meal.
If food starts to stick on the stovetop, add a splash of water or broth, or let it cook in its own moisture.
With these basics in place, the methods below get much easier to use. First up: steaming, the simplest place to start.
1. Steaming
Steaming is simple: set a pot over heat, add a lid, and use a steam basket or rack so the food sits above simmering water. Bring the water to a boil first. Then add the food and cover the pot. It’s a good pick when you want a fast side dish without much hands-on work.
This method shines with vegetables that you want to keep light and clean-tasting. It works best for more delicate options like asparagus, broccolini, broccoli, snow peas, and snap peas. These tend to stay tender-crisp instead of turning soft and limp.
Heavier vegetables, like potatoes and Brussels sprouts, usually do better with dry heat. With green vegetables, timing matters a lot. Cook them only until tender-crisp. If they go too long, the color fades and the texture suffers. A fork is the easiest way to check. Stop as soon as the vegetables feel tender-crisp.
For more flavor, finish steamed vegetables with lemon juice or vinegar to sharpen flavor.
If you want the same low-fat simplicity for proteins, move next to poaching.
2. Poaching
Poaching is a smart pick for delicate proteins when you want them moist and tender without using oil. The idea is simple: cook the food in water, stock, or broth that’s just below a simmer. Keep the liquid between 180°F and 200°F, so you see only small bubbles at the bottom.
This works best for foods that can dry out fast or break apart under direct heat, like chicken breasts, fish fillets, shrimp, eggs, and fruit. A deep skillet or saucepan is your best bet, as long as it holds the food in a single layer.
Plain water can leave food flat. It helps to season the liquid with salt, lemon, and herbs such as parsley, tarragon, or thyme. Simmer those aromatics for 12 minutes before adding the food [5].
When the food is done, lift it out with a slotted spoon so it doesn’t sit in the liquid and turn soggy. And don’t pour that liquid down the drain. Save the poaching liquid for a light sauce or soup base, then finish it with lemon or chives.
3. Roasting on Parchment or Silicone Mats
Roasting without oil can work surprisingly well. Parchment paper or a silicone mat keeps food from sticking, and the food’s surface moisture helps it brown. For home cooks, that gives you a repeatable setup: a sheet pan, a liner, high heat, and enough space between pieces. Done right, you get crisp edges and even browning without added fat.
Starchy vegetables like potatoes and Brussels sprouts tend to work best. Extra-firm tofu is another good pick. Roast it at 400°F and it can develop a golden, crisp exterior without added fat [6]. Falafel works too, since it browns on the outside while staying tender inside [4]. If you want a faster stovetop version of this oil-free method, the next approach swaps dry oven heat for gentler pan heat.
Preheat the lined sheet pan for 10 minutes before adding the food. Cut vegetables into even 1/2-inch pieces so they cook at the same rate [7]. Then spread everything in a single layer, with space between pieces, so the food roasts instead of steams [8]. Flip halfway through cooking.
You can season with dry spices, garlic, or onion before roasting [9]. And if you want faster crisping, air frying uses the same dry-heat idea.
4. Dry Sautéing with Water or Broth
Dry sautéing is a smart way to cook vegetables that need a bit of movement in the pan without using oil. Instead of fat, you use small splashes of water or broth to keep things moving and help the vegetables soften. It works especially well for aromatic vegetables like onions, carrots, and celery. It also suits high-moisture vegetables like zucchini, which often give off enough liquid to cook with little or no added fat [2][10].
The big shift here is simple: you manage moisture instead of leaning on oil for movement and browning.
Start with a hot pan. If you’re using stainless steel or cast iron, preheat it until a few drops of water sizzle and evaporate within 2–3 seconds. That step matters. If the pan is too cool, you’re not sautéing – you’re steaming.
As the pan starts to dry out, add 1–2 tablespoons of water or broth at a time [3]. Broth adds a savory note. Water keeps the flavor neutral [3]. At the end, a little lemon juice or vinegar can wake everything up with some brightness [3].
If you want that same kind of control in the oven, the next method swaps stovetop moisture for dry heat.
5. Baking with Moisture-Rich Oil Substitutes
In the oven, moisture does part of the work oil usually handles. It helps baked goods stay tender instead of dry.
For muffins, quick breads, brownies, cakes, and pancakes, moisture-rich ingredients can step in for some of oil’s tenderizing role. Applesauce, yogurt, mashed banana, pumpkin puree, and similar purées all work well here. They help hold on to moisture and structure, so the final texture stays soft instead of turning dense.
Cookies are a little different. Milk can replace up to one-third of the fat without much loss in quality [12]. That said, the texture will shift. Moist substitutes tend to make cookies softer, while butter usually gives you a crisper bite [12].
You can also bring back some of the richness that fat would have added. A little vanilla, almond, lemon, or orange extract can help a lot [12].
A few baking habits matter more when you cut back on fat:
- Sift the dry ingredients
- Use room-temperature eggs and milk
- Whisk the wet ingredients until smooth [11]
When crisp results matter more than tenderness, the next method turns to circulating hot air.
sbb-itb-7261261
6. Air Frying
Air frying uses the same dry-heat idea as roasting, but the moving hot air browns food faster and usually needs little to no oil.
It works especially well for potatoes, plantains, falafel, Brussels sprouts, breaded chicken, and extra-firm tofu. Wet batters, loose cheese, and delicate greens are a bad fit because they don’t crisp well.
A few small steps make a big difference:
- Preheat the air fryer
- Arrange the food in a single layer
- Shake the basket or flip the food halfway through
- For breaded foods, brush on mustard first so the coating sticks
Tofu is a good example of how this method can go right – or wrong. If it holds too much liquid, it won’t brown well. It’ll steam instead. Drain extra-firm tofu well before cooking. Then marinate it in soy sauce and spices for 20 minutes, and air fry it at 400°F for 10 to 15 minutes for a firm, savory result [6].
Some foods need direct flame, not circulating air. That’s where grilling comes in next.
7. Grilling Without Added Oil
Grilling without oil comes down to high heat and dry surfaces. Dry the food, season it well, and let the grate do the work. The main things to manage are moisture, heat, and timing.
This method works best with boneless skinless chicken thighs, flank steak, salmon, sturdy vegetables like asparagus, bell peppers, mushrooms, and onions, and firm fruit like peaches or mangoes [15][16]. Salmon is a strong pick here. Grill it skin-side down, and the skin acts like a barrier while it crisps without added fat [15].
Start by drying the food well. If the surface is wet, it will steam instead of grill. Then season it with a dry rub. Garlic powder, onion powder, paprika, cumin, and smoked paprika all work well, and they can help the food release more cleanly [13][16]. Instead of oil, use citrus, vinegar, or fruit purée [13].
Heat the grill to medium-high. Once the grate is hot enough to give the food an immediate sizzle, start cooking. Then wait. Don’t move the food too soon. When it has browned enough, it will lift from the grates more easily on its own. Use tongs instead of a fork so the juices stay inside [14]. For small vegetables, a grill wok makes the job easier [15][16].
For stovetop cooking that also relies on a clean release, the next method uses cookware that naturally resists sticking.
8. Using Nonstick or Well-Seasoned Cookware
The pan you use takes a lot of the trial and error out of oil-free cooking. Nonstick skillets are a good fit for delicate foods like eggs and fish fillets, but they’re not made for high heat [17]. Seasoned cast iron builds a natural nonstick surface over time and holds heat very well, though it’s heavy and can react with acidic ingredients like tomatoes or citrus [17]. For high-heat searing, go with heavy-gauge stainless steel. Clad construction spreads heat more evenly and cuts down on hot spots. So the best choice comes down to what you need most: easy release, steady heat, or strong browning.
Preheat the pan before adding food. That hot surface helps food release more cleanly and brown instead of steam.
Don’t rush the flip. Proteins like tofu and fish will pull away from the pan on their own once a crust has formed. If it sticks when you try to move it, it’s not ready yet – give it a bit more time before flipping [1].
You can also deglaze the hot pan with a splash of water or broth. That loosens the fond and turns it into a fast pan sauce. Oil-free cooking can still build deep flavor, not just lighter meals.
Use the table below to pair each cooking method with the easiest pan for the job.
Quick Comparison Table: Which Oil-Free Method Should You Use?
Use this table when you want the shortest route from ingredient to cooking method.
| Method | Best For | Tools | Result | Main Mistake |
|---|---|---|---|---|
| Steaming | Broccoli, asparagus, delicate fish | Steamer basket, pot with tight-fitting lid | Tender and bright | Do not overcook; stop at tender-crisp |
| Poaching | Eggs, fish fillets, chicken breast | Wide pan, mesh skimmer, perforated spoon | Tender and moist | Keep the heat gentle and steady so delicate foods stay tender [10] |
| Roasting on Parchment | Sweet potatoes, squash, root vegetables | Sheet pan, parchment paper | Browned edges | Cut vegetables evenly and leave space on the pan |
| Dry Sautéing | Onions, mushrooms, aromatic vegetables | Heavy-bottomed skillet (cast iron or stainless steel) | Softened, browned, concentrated flavor | Preheat the pan well; if not, food can steam instead of brown [1] |
| Baking | Muffins, quick breads, cakes, pancakes | Mixing bowls, whisk, loaf or muffin pans | Light and tender | Too much heat can dry out baked goods and affect texture [1] |
| Air Frying | Potatoes, plantains, frozen vegetables | Air fryer basket, tongs | Crisp outside, tender inside | Avoid wet batters, loose cheese, and fresh leafy greens – they cook unevenly or create a mess [4] |
| Grilling Without Added Oil | Corn, peppers, sturdy proteins | Grill, long-handled tongs, vegetable brush | Charred and firm | Dry the food well before cooking; wet surfaces steam instead of grill |
| Using Nonstick or Well-Seasoned Cookware | Foods that need a clean release | Nonstick skillet, cast iron, stainless steel | Easy release and light browning | Overheating can damage nonstick surfaces; watch for food release instead of relying on a timer [1] |
Once you know which method fits the food, the next move is mixing and matching them into easy weeknight meals.
How to Combine These Methods for Better Weeknight Meals
Use these methods together to get better texture on a busy night. Moist-heat cooking, like steaming and poaching, helps food stay tender. Dry heat, like air frying and roasting, adds crisp edges and browning. Put them together, and you get both in one meal.
The easiest move is simple: start with moist heat, then finish with dry heat.
Steam broccoli until it’s just tender, then slide it into a hot oven for a few minutes. You keep the bright green color and soft bite, but you also get a little crispness without extra oil. Poach a chicken breast until it’s cooked through, slice it, and serve it over a grain bowl with roasted vegetables. With tofu, start by cooking it with moist heat, then air fry it so the outside firms up and lightly crisps.
This kind of cooking also helps you move faster. Start with the part that takes the longest, usually a grain, starch, or protein cooked with moist heat. Then do the short dry-heat finish right before serving.
If the final dish tastes flat, add a squeeze of lemon juice or a splash of vinegar. That small last step can wake everything up. It’s the same kind of repeatable kitchen habit that pro training is built on.
Park City Culinary Institute: Building Real Technique Beyond the Basics

Every method in this article comes back to heat control, and Park City Culinary Institute puts technique first. That matters because these are the same skills home cooks lean on for steaming, poaching, roasting, and dry sautéing.
The same approach sharpens the core kitchen skills behind everything covered above: controlling heat, managing moisture, and judging doneness by sight and touch. It’s the kind of stuff that can seem small at first, but in the pan, it changes everything.
That focus on technique is supported by structured training. The institute has won Best of State in Culinary Education six years in a row, and its chef instructors average more than 10 years of industry experience [19]. Programs include a 216-hour Professional Certificate in Culinary Arts, a 108-hour Cuisine Certificate, and online study starting at $2,440 [19].
Graduate Amy Roskelley said the small technique details made the biggest difference in flavor and texture [18].
Conclusion
The best oil-free meals happen when the cooking method fits the ingredient. Some foods need dry heat. Others do better with moisture. Texture matters too, and that match is what makes the dish work.
The bigger change is this: cook for the ingredient, not just the recipe. That’s why repetition helps so much. The more often you use these methods, the more natural they feel. Start with one – maybe steaming or dry sautéing – and stick with it for a few weeks. Then bring in another.
Flavor doesn’t come from oil. It comes from heat control, timing, seasoning, and technique.
FAQs
How do I keep food from sticking without oil?
Use high-quality nonstick or well-seasoned cookware, and watch your heat. Food often sticks because the pan didn’t get hot enough before cooking started.
For stainless steel, preheat the pan to 350–400°F. A simple check is the water droplet test: add a drop of water, and it should sizzle and evaporate in 2–3 seconds.
When roasting, parchment paper or silicone mats can make cleanup much easier. For sautéing, a small splash of water or broth can help keep food moving instead of clinging to the pan.
Which oil-free method is best for crispy foods?
The air fryer is one of the best ways to get crispy results without oil. Fast-moving hot air creates a crunchy outside while keeping the inside tender.
It works especially well for potatoes, plantains, Brussels sprouts, and tofu. For roasted vegetables, a 450°F oven also helps create browning and texture without sogginess.
How can I add flavor when cooking without oil?
Build flavor without oil by working with the five basic tastes: sweet, salty, sour, bitter, and umami. When those tastes are in balance, food doesn’t feel flat or one-note.
A little acid can do a lot of heavy lifting. Lemon juice or vinegar can brighten a dish and make the other flavors taste stronger.
Fresh herbs help too. So do high-quality ingredients and good heat control, since both help food keep its natural taste instead of cooking it away.
If you want to make a dish more interesting, try an unexpected pairing. Sometimes that small twist is what makes the whole thing click.