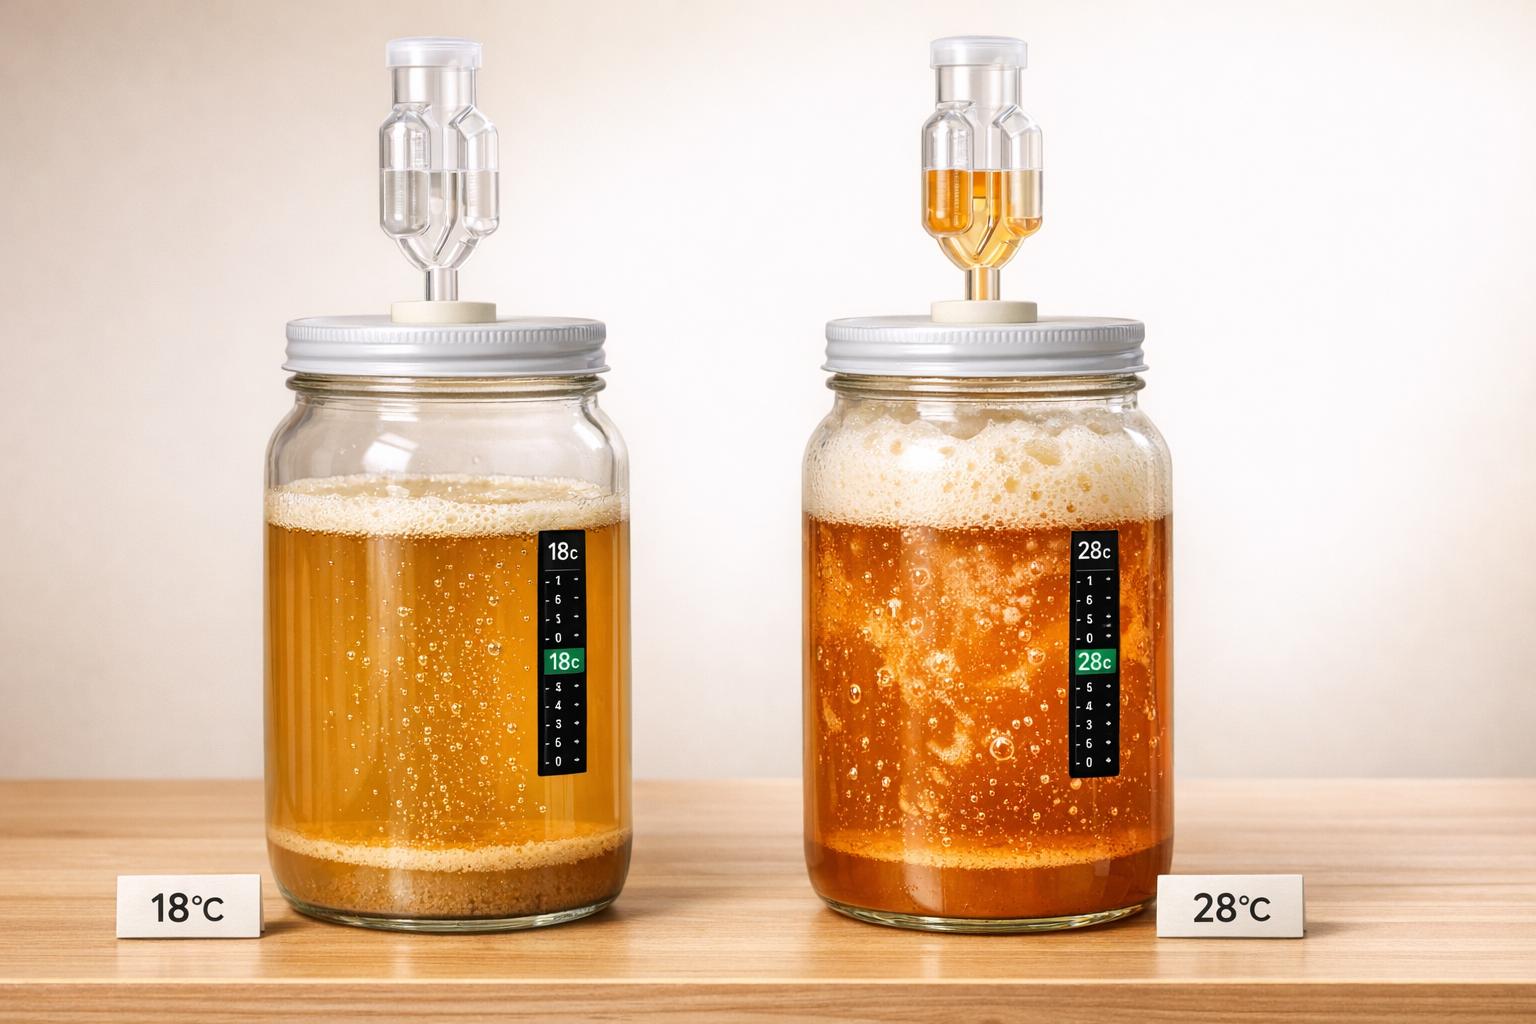
Temperature directly impacts the activity of fermentation microbes, influencing flavors, textures, and overall success. Each microorganism thrives within a specific range, and even slight temperature variations can lead to spoilage, off-flavors, or fermentation failure. Here’s what you need to know:
- Warm temperatures speed up microbial activity but risk producing unwanted byproducts like fusel alcohols or esters.
- Cool temperatures slow down fermentation, leading to cleaner flavors but longer timelines.
- Ideal ranges vary by microbe:
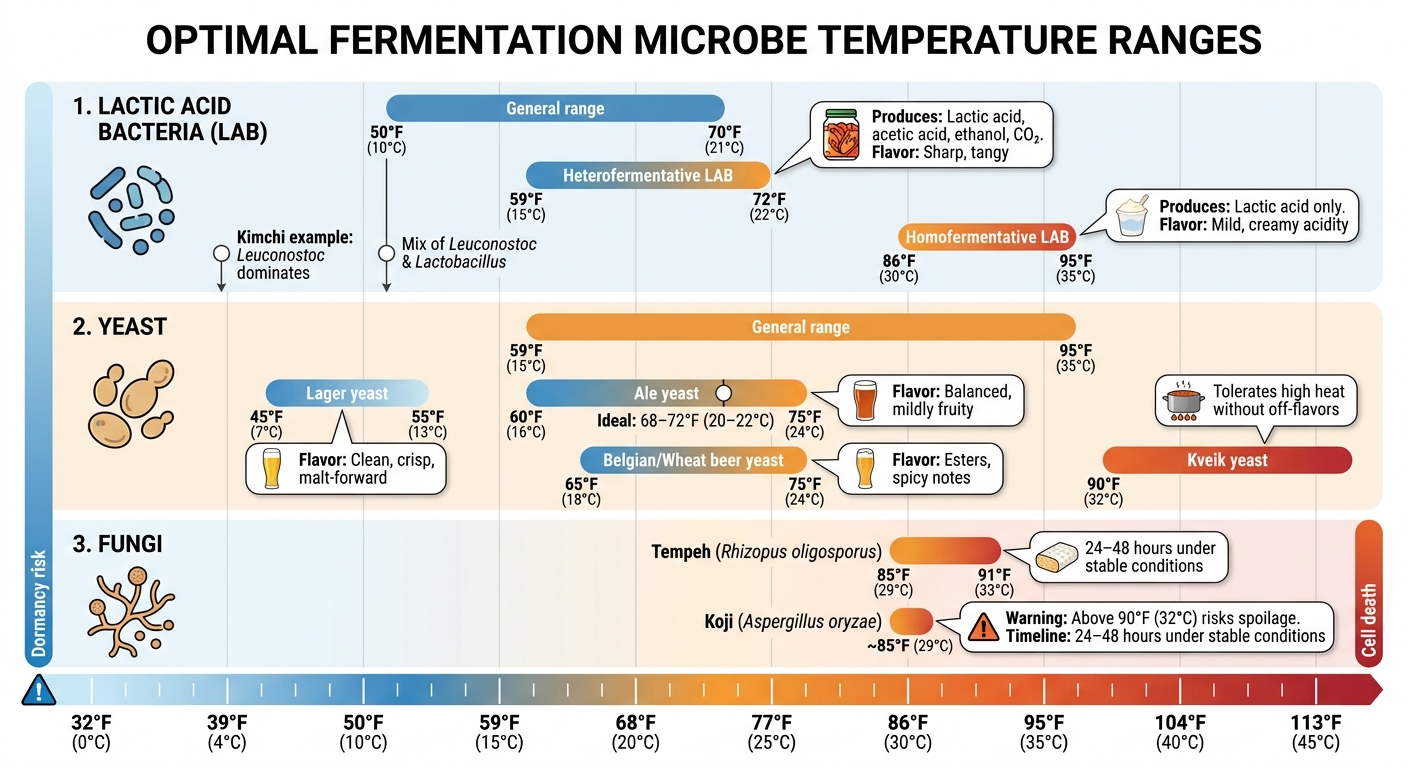
- Lactic acid bacteria: 50–70°F for vegetables, with tangier flavors at cooler levels.
- Yeast: Ales prefer 60–75°F; lagers thrive at 45–55°F.
- Fungi (e.g., tempeh): 85–91°F, but excessive heat can ruin the batch.
- Control temperature using tools like thermometers, insulation, or cooling systems.
Managing temperature ensures consistent, high-quality fermentation, whether you’re making kimchi, beer, or sourdough. Monitoring tools and small adjustments can make all the difference.
FERMENTATION TEMPERATURE CONTROL COMPARED | What is the BEST METHOD For You?
sbb-itb-7261261
Optimal Temperature Ranges for Fermentation Microbes
Optimal Temperature Ranges for Fermentation Microbes: LAB, Yeast, and Fungi
Temperature plays a crucial role in fermentation, directly influencing the activity and behavior of microbes, a key concept in food science. Each microorganism has a specific range where it thrives, impacting the flavors, textures, and overall success of the fermentation process. Let’s take a closer look at the ideal conditions for some key fermentation players.
Lactic Acid Bacteria (LAB) in Vegetable Fermentation
Vegetable fermentations generally do well at room temperature, which falls between 50°F and 70°F (10–21°C) [3]. Different LAB species dominate at various stages depending on the temperature:
- Heterofermentative LAB, which produce lactic acid, acetic acid, ethanol, and CO₂, thrive in cooler temperatures around 59–72°F (15–22°C). These microbes tend to create sharper, more tangy flavors [3].
- Homofermentative LAB, which only produce lactic acid, prefer warmer conditions between 86–95°F (30–35°C), resulting in milder, almost creamy acidity [3].
For example, research on kimchi shows that at 39°F (4°C), Leuconostoc species dominate, while at 50°F (10°C), a mix of Leuconostoc and Lactobacillus species emerges [3].
However, high temperatures can weaken the pectin in vegetables, making them mushy. Tim Chin, a professional cook and fermentation expert, explains:
"Low temperatures tend to favor sharper, more vinegar-like flavors due to the increased production of acetic acid; higher temperatures bring milder acidity and almost dairy-like notes" [3].
To counteract temperature variations, adjusting salt concentration is key. In warm conditions, higher salt levels (up to 10%) slow microbial activity and reduce spoilage risk. In cooler settings, lower salt levels (around 2%) can speed up fermentation [3].
Yeast in Alcoholic Fermentation
Yeast operates within a broader temperature range, typically between 59°F and 95°F (15–35°C), though specific strains have their preferences [1][4]:
- Ale yeast works best at 60–75°F (16–24°C), with an ideal range of 68–72°F (20–22°C). This produces balanced, mildly fruity flavors [1][4].
- Lager yeast prefers cooler temperatures, around 45–55°F (7–13°C), resulting in clean, crisp, malt-forward beers [4].
- Belgian and wheat beer yeasts ferment well at 65–75°F (18–24°C), creating distinct esters and spicy notes [4].
Temperature choices significantly influence the flavor profile. Cooler settings reduce byproducts, creating clean-tasting results, while warmer temperatures encourage ester (fruity) and fusel alcohol (hot or solvent-like) production [4][5]. Certain strains, like Kveik yeast, can even tolerate temperatures above 90°F (32°C) without developing the off-flavors that typically arise from heat stress [2].
Fungi in Specialty Ferments
Fungal fermentations demand precise temperature control. For example:
- Tempeh production, using Rhizopus oligosporus, requires a range of 85–91°F (29–33°C) [6].
- Koji, made with Aspergillus oryzae, performs best around 85°F (29°C). Temperatures above 90°F (32°C) risk spoilage [8].
Fungal fermentations are particularly sensitive during their self-heating phase. Within 12–24 hours, the fungi become active and generate internal heat, which must be carefully managed to avoid overheating [7][8]. Michael Ham, a fermentation author, advises:
"Once the tempeh fungus has taken hold (12 to 24 hours after starting it), remove the batch from the incubator and put it on a raised rack to continue fermentation at room temperature" [7].
Judith Browning highlights the risk of overheating, noting that stirring every four hours can prevent "hot spots" during fermentation [8]. Under stable conditions, tempeh takes 24–48 hours to complete, but fluctuating temperatures can extend this to over 96 hours [6][8].
Effects of Temperature Extremes on Fermentation Microbes
Managing temperature is a key factor in fermentation, as it directly affects microbial activity, process efficiency, and flavor outcomes. When temperatures stray from the ideal range, fermentation microbes react in predictable ways – often with negative consequences.
Low Temperature Effects
Cold temperatures slow down enzymatic processes, stretching fermentation timelines from a few days to several weeks [2][1][5]. When the temperature drops below 39°F (4°C), microbes, including yeast, can become dormant or sluggish. Yeast tends to flocculate, which reduces its ability to convert sugars efficiently [1][5]. Kara Taylor, Head of Operations at White Labs, highlights this effect:
"As the fermentation temperature decreases, we see lower expressions of flavor and aroma" [2].
This results in a cleaner and simpler flavor profile. To counteract the slowed microbial growth, brewers often increase the pitch rate of yeast [5]. For instance, traditional European lagers are fermented at 46–50°F (8–10°C) to achieve their signature clean taste [5].
On the other hand, higher temperatures bring their own challenges.
High Temperature Effects
Warmer conditions speed up microbial reactions but can lead to undesirable byproducts. While brewer’s yeast operates effectively between 80–90°F (27–32°C), these temperatures often produce excessive esters and fusel alcohols, which can give off harsh, solvent-like flavors [5][2]. White Labs explains:
"A compound like ethyl acetate may be fruity and pleasing at levels just above sensory threshold, but if production increases to high this metabolite can be perceived as nail polish remover" [5].
In silage fermentation, temperatures around 104°F (40°C) cause lactic acid bacteria to shift from efficient homolactic fermentation to less productive heterolactic fermentation [9]. A 2023 study conducted in Ningxia, China, observed that high-temperature fermentation increased ammonia nitrogen levels while reducing lactic acid. However, by introducing Lactobacillus plantarum and tea residue, researchers improved crude protein by 48.9% and reduced ammonia nitrogen by 46.4% [9].
When temperatures exceed 113°F (45°C), the heat damages cell membranes and enzymes, leading to microbial death [9][1]. Additionally, fermentation is an exothermic process, meaning it produces heat. This can create a feedback loop where rising temperatures further intensify microbial activity, compounding the problem [1].
| Temperature Range | Microbial Response | Flavor Impact | Timeline |
|---|---|---|---|
| Below 39°F (4°C) | Dormancy, flocculation | Clean, muted aromas | Weeks instead of days |
| 68–72°F (20–22°C) | Optimal for ales | Balanced, mildly fruity | Standard fermentation |
| 80–90°F (27–32°C) | Peak growth, stress | Fusel alcohols, esters | Accelerated but risky |
| Above 113°F (45°C) | Cell death | Spoilage, off-flavors | Fermentation failure |
Monitoring and Controlling Fermentation Temperature
Keeping fermentation at the right temperature is essential for avoiding off-flavors and achieving consistent results. While monitoring is the first step, stabilizing the temperature is just as critical. Using the right tools can make all the difference.
Using Temperature Monitoring Tools
Adhesive temperature strips, often called fermometers, are a budget-friendly option at just $2.99 [11]. These strips stick to the outside of your fermenter and provide a quick visual readout. For more precision, a digital probe thermometer ($17.99) offers accuracy down to 0.1°F [11]. To use one effectively, secure the probe to the fermenter wall and insulate it with foam to block ambient air interference. For the most precise readings, consider a thermowell – a stainless steel tube that sits inside the liquid, capturing the actual internal temperature.
If you’re looking for advanced monitoring, wireless floating sensors like the Tilt ($135.00) can transmit real-time temperature and gravity data to your smartphone via Bluetooth [12]. For even finer resolution, the Tilt Pro Mini ($175.00) measures in 0.1°F increments [12]. One user, Steve, shared his experience:
"The cloud data gives me a deeper understanding for my fermentations. It is especially helpful for meads and lagers where I want to take action at a particular SG point" [12].
To ensure accuracy, calibrate digital tools regularly using a 32°F ice-water bath. Once your tools are properly calibrated, you’ll be better equipped to manage temperature fluctuations.
Temperature Management Techniques
For small adjustments, passive insulation works well. Wrapping your fermenter in blankets or a neoprene jacket can trap the heat generated during active fermentation, raising the temperature of a 5-gallon batch by 10 to 15°F [13]. In warmer weather, evaporative cooling can help. Drape a wet t-shirt over the fermenter and aim a fan at it – this simple method can lower temperatures by 5 to 15°F below the ambient air [13]. For more cooling power, add frozen water bottles to the fermenter or place it in an ice bath.
If you want to take the guesswork out of temperature control, active systems are the way to go. Digital controllers, such as the Inkbird WiFi ITC-308 ($32.99), use probes to automatically regulate heating pads or refrigerators to maintain your desired temperature [11]. Electric heating jackets can add about 10°F to a 5-gallon batch [13]. For professional-grade control, glycol-jacketed conical fermenters (priced between $1,500 and $2,500) provide precise heating and cooling capabilities [13]. Wherever you set up your fermenter, choose a location with minimal temperature swings, like a basement or interior closet [13][14].
Adjustments for Specific Microbes
Different microbes thrive at different temperatures, so fine-tuning is important. Ales generally do well with a heating jacket and a controller to keep things warm [13]. Lagers, on the other hand, need cooler conditions, often requiring a dedicated refrigerator or glycol system [13]. For vegetable ferments, lactic acid bacteria behave differently depending on the temperature: above 77°F (25°C), they produce creamy flavors, while below 72°F (22°C), they create tangier, more acidic notes [10].
Temperature ramping is another useful technique. Start at the lower end of the recommended range and gradually increase by 1–2°F each day. This approach keeps yeast active and prevents off-flavors. Toward the end of beer fermentation, raising the temperature slightly for a diacetyl rest allows yeast to reabsorb buttery flavors. In sourdough fermentation, a cold retard at 37–41°F halts yeast activity while allowing lactic acid bacteria to develop more complex, sharp flavors [10].
Practical Tips for Consistent Fermentation Results
Perfecting your fermentation process often comes down to testing and fine-tuning. A great way to start is by working with small batches. For example, divide your recipe into two or three portions and ferment them at different temperatures – like 60°F, 68°F, and 75°F. This lets you see how temperature affects the flavor, texture, and timing of your final product.
Experimenting with Small Batches
Precise temperature control is important, but pairing it with small-scale testing can make a big difference. One method to try is the aliquot jar technique. Here’s how it works: take a 30-gram sample of your mixture and place it in a small, straight-sided jar alongside your main batch. This setup allows you to monitor volume changes without disturbing the primary ferment [10]. As the sample rises, you’ll have a clear, measurable way to track progress – no guesswork needed. Keep detailed notes on the temperature and timing for each trial to refine your process.
Insulation and Storage Solutions
Temperature stability is key for fermentation. Spaces like interior closets or basements are often more stable than areas with exterior walls or windows [2][10]. If you live in a warm climate, consider using an air-conditioned room or a chest cooler to avoid overheating, which can lead to unpleasant, solvent-like flavors. In colder environments, the oven light trick can be a lifesaver – place your fermenter in a closed oven with only the light on to maintain a steady 78–86°F [10]. If it gets too warm, crack the door slightly for ventilation. For additional temperature control, wrap your vessels in blankets to retain heat or use wet towels for evaporative cooling during hotter months [4]. These practical storage solutions help ensure your fermentation stays on track.
Refrigeration for Post-Fermentation
Once your ferment reaches the desired flavor and texture, refrigeration becomes essential to slow down microbial activity and preserve quality. Transfer your finished product – whether it’s vegetables, bread dough, or beverages – to a refrigerator set between 37–41°F [10]. Keep in mind that warm products may continue fermenting for another 1–2 hours after being placed in the fridge, so adjust your timing if needed. For sourdough, this "cold retard" process halts yeast activity while deepening flavor complexity. Similarly, cold crashing at the end of fermentation encourages microbes to settle, resulting in a clearer and more polished final product [5].
Conclusion
How Temperature Affects Fermentation Success
Temperature plays a critical role in determining fermentation success. Staying within the ideal temperature range boosts enzyme activity and influences the resulting flavors. On the flip side, straying too far from this range can stress microbes, leading to off-flavors or even fermentation failure. Cold temperatures might stall the process, while excessive heat can kill off essential microbes. By understanding how temperature impacts fermentation, you can sidestep these challenges, refine flavors, and produce a clear, quality final product. These insights are valuable for both home brewers and professionals aiming for consistent results.
Practical Steps for Home and Professional Fermenters
Start by ensuring your thermometer is accurate. A simple way to do this is by calibrating it in a 50/50 ice water bath, which should read 32°F [1]. When monitoring your fermentation, focus on the liquid’s internal temperature rather than just the surrounding air. The metabolic activity during fermentation often causes the liquid’s temperature to rise significantly.
For home brewers, maintaining a stable environment is key. Basements or other temperature-stable areas can help, and basic insulation methods can keep your fermentation within the 78–86°F range [10]. If precise control isn’t an option, consider using yeast strains like Belgian, Saison, or Kveik. These strains are known for their ability to ferment cleanly, even when temperatures exceed 90°F [2]. For professional setups or advanced home brewers, investing in temperature-controlled equipment, such as fermentation chambers or refrigerators, is a game-changer for achieving consistent results.
"Controlling the temperature of my fermentations was hands down the best investment I could have made in the quality of my homebrew."
- Kara Taylor, Head of Operations, White Labs [2]
For those looking to fine-tune their process, advanced techniques like the diacetyl rest can be a game-changer. This involves raising the temperature near the end of fermentation to let the yeast reabsorb buttery off-flavors. Similarly, gradually increasing the temperature during high-gravity fermentations can help the microbes complete the process successfully [5]. By mastering temperature control, you can turn unpredictable fermentations into consistently high-quality results.
FAQs
What temperature should I aim for inside the ferment, not just the room?
For the best results during fermentation, keep the internal temperature between 75°F and 85°F (24°C to 29°C). This range creates an ideal environment for microbes to thrive. It’s important to focus on the temperature of the ferment itself – not just the room temperature – to ensure these conditions are met.
How can I cool or warm a ferment without buying special equipment?
Keeping the right temperature for your ferment doesn’t require fancy equipment. You can use a few simple tricks with items you probably already have at home.
- To cool things down: Move your fermenter to a cooler spot, like a basement or a cellar. If that’s not an option, wrap some ice packs in a cloth and place them around the fermenter. This helps lower the temperature gradually.
- To warm things up: Position the fermenter near a radiator or use a heating pad set to low. Just make sure to wrap the heating pad in a towel to avoid overheating the ferment.
These straightforward methods can help you maintain the ideal conditions for fermentation without the need for specialized gear.
How do I fix a ferment that got too hot or too cold?
To adjust a fermentation that’s running too hot, try moving the vessel to a cooler spot, using a temperature-controlled chamber, or surrounding it with ice packs. On the flip side, if it’s too cold, gently warm it by placing it near a mild heat source or relocating it to a warmer area. Keeping the temperature steady is key since big fluctuations can interfere with yeast activity and result in unwanted flavors.