Using a meat thermometer is the only reliable way to ensure your roast is both safe to eat and perfectly cooked. Forget relying on color or timers – these methods can mislead you. Here’s what you need to know:
- Why use a thermometer? Undercooked meat can harbor bacteria, while overcooked meat loses its juiciness. A thermometer ensures you hit the right internal temperature every time.
- Key temperatures: Poultry must reach 165°F, while beef, lamb, and pork are safe at 145°F.
- Types of thermometers: Choose between digital (fast and precise), analog (battery-free but slower), instant-read (quick checks), or leave-in models (continuous monitoring).
- Smart thermometers: Bluetooth and Wi-Fi options send real-time updates to your phone, making cooking even easier.
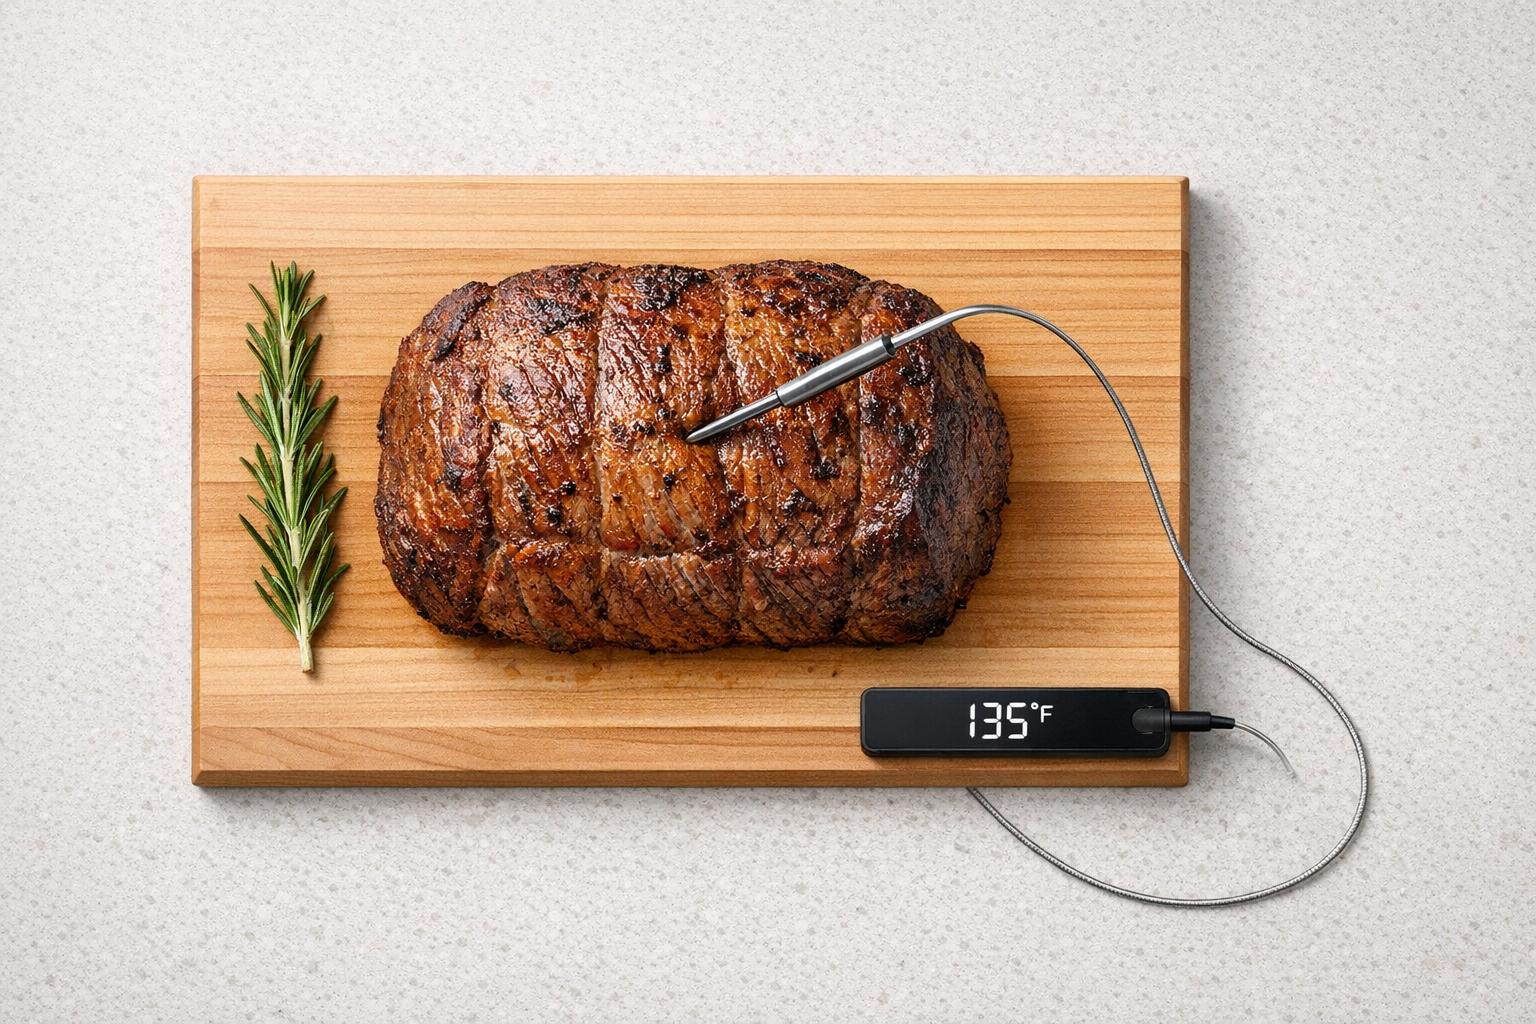
- Proper use: Insert the probe into the thickest part of the meat, avoiding bones and fat, for an accurate reading. Remove meat 5°F below the target temperature to account for carryover cooking.
Using a thermometer transforms guesswork into precision, ensuring every roast is safe, juicy, and perfectly cooked.
How to Use a Meat Thermometer | Roasts, Steaks, Burgers
sbb-itb-7261261
Types of Meat Thermometers
Thermometers come in various designs and functionalities, so choosing the right one depends on the type of roast you’re preparing and how closely you want to monitor it.
Digital vs. Analog Thermometers
Digital thermometers are known for their precision, offering readings accurate to 0.1°F within 5–10 seconds [2][4]. They often come with helpful features like alarms, timers, and preset temperature settings for different meats. While they are low-maintenance and rarely need calibration, they do rely on batteries and electronics, which can occasionally fail.
Analog thermometers, on the other hand, work using a bimetal coil and provide readings within 15–20 seconds, usually in 1–2°F increments [2][4]. They don’t need batteries but require regular calibration – sometimes as often as daily – to stay accurate. For roasting, digital thermometers are often the better choice, especially for hands-off cooking [2][4]. These differences also influence how they’re used, particularly when comparing instant-read and leave-in models.
Instant-Read vs. Leave-In Thermometers
Thermometers are also categorized by how they’re used: instant-read models for quick temperature checks and leave-in models for continuous monitoring.
Instant-read thermometers are perfect for quick spot-checks, especially near the end of cooking. Simply insert the thermometer into the thickest part of the meat, read the temperature, and remove it immediately. Since they’re not oven-safe, leaving them inside could cause them to melt or break. They’re a great choice for thinner cuts like burgers or fillets, or for checking different parts of a large roast [2][5].
Leave-in thermometers are designed to stay inside the meat throughout the cooking process, allowing you to monitor the temperature without opening the oven [2][5]. This category includes traditional dial thermometers, corded digital probes, and wireless smart probes. They’re ideal for larger roasts, whole poultry, or any long cook where maintaining a consistent oven temperature is key [2][5].
Smart Thermometers with Mobile Connectivity
Smart thermometers take precision to the next level by sending real-time temperature updates directly to your smartphone. These devices connect via Bluetooth or Wi-Fi, allowing you to track both meat and oven temperatures through an app [5]. Many apps also provide step-by-step cooking guidance, estimated finish times, and alerts for when it’s time to remove the meat or let it rest [5].
Bluetooth models, such as the MEATER Plus ($79.99), offer ranges between 164 and 250 feet, making them great for monitoring indoor roasts while staying nearby [6]. Wi-Fi models, like the ThermoWorks Signals ($249.00), provide unlimited range, so you can keep an eye on your roast from anywhere with an internet connection [6][7]. As Traeger Grills explains:
With data sent directly to your phone, there’s no need to open and close your grill, helping you lock in heat, flavor, and precision. [6]
Smart thermometers are used by over 75 million cooks around the world and can handle ambient temperatures as high as 1,000°F [5][7]. To protect the internal electronics from extreme heat, be sure to insert the probe beyond the safety notch [5][6].
Step-by-Step Guide to Using a Meat Thermometer
How to Insert a Meat Thermometer Correctly
To get an accurate reading, insert the probe into the thickest part of the meat. Be careful to avoid touching bone, fat, or gristle, as these can throw off the temperature. Reed Lalor, Vice President at ThermoPro, emphasizes:
Inserting the probe into a cold spot or hot spot can result in improperly cooked food. [2]
For dial thermometers, you need to insert the probe at least 2 inches deep to get a proper reading. Digital instant-read models, on the other hand, only require about 0.5 inches of insertion [3]. When working with thinner cuts like pork chops or burgers, insert the probe sideways through the edge, aiming for the center [3].
A helpful tip is to use the retraction method. Push the probe all the way through the meat (or until it hits a bone), then slowly pull it back. The lowest temperature you see during this process is the actual internal temperature. J. Kenji López-Alt, Culinary Consultant at Serious Eats, explains:
Pulling the thermometer out is a much smoother process, giving you finer control. [1]
For poultry or lamb, focus on the thickest part of the meat, steering clear of any bones [2]. Once you’ve inserted the thermometer properly, keep an eye on the temperature to ensure the meat is cooking just right.
Checking Temperature During Roasting
It’s a good idea to check the temperature a few minutes before the estimated cooking time ends. This helps avoid overcooking, as oven performance and meat density can vary [2]. Reed Lalor advises:
If you’re using an instant-read thermometer, check the internal temperature a couple minutes before the estimated finish time. [2]
Leave-in thermometers can stay in the meat throughout the cooking process, allowing you to monitor the temperature without opening the oven door. For instant-read thermometers, work quickly to minimize heat loss. Here’s a pro tip: remove the meat when it’s 5°F below your target temperature. The internal heat will continue to rise as the meat rests, a phenomenon known as carryover cooking [2]. For example, poultry should be pulled at 160°F to reach the safe final temperature of 165°F after resting [2].
If you need to recheck the temperature, make sure to clean the probe with a damp, soapy cloth before reinserting it. This prevents cross-contamination between undercooked and nearly finished meat [2].
Calibrating and Cleaning Your Thermometer
To ensure your thermometer remains reliable, regular calibration and cleaning are a must. Use the ice water method to test its accuracy: fill a glass with ice water, let it sit for three minutes, and then insert the probe without touching the sides or bottom. It should read 32°F [8]. For digital thermometers, leave the probe in the ice bath for 30 seconds. Dial models may need 1–2 minutes [8].
If the reading is off, adjust dial thermometers by twisting the calibration nut until it displays 32°F. For digital models that can’t be adjusted, note the error and factor it in when measuring temperatures [8].
After each use, clean the probe with a damp cloth and mild dish soap. Follow up with rubbing alcohol to eliminate any lingering bacteria [9]. Avoid submerging the electronic display in water to prevent damage. Proper cleaning not only ensures food safety but also keeps your thermometer functioning well over time. Store it in a protective case in a cool, dry place, and regularly inspect it for damage, such as cracks or a dimming display [9].
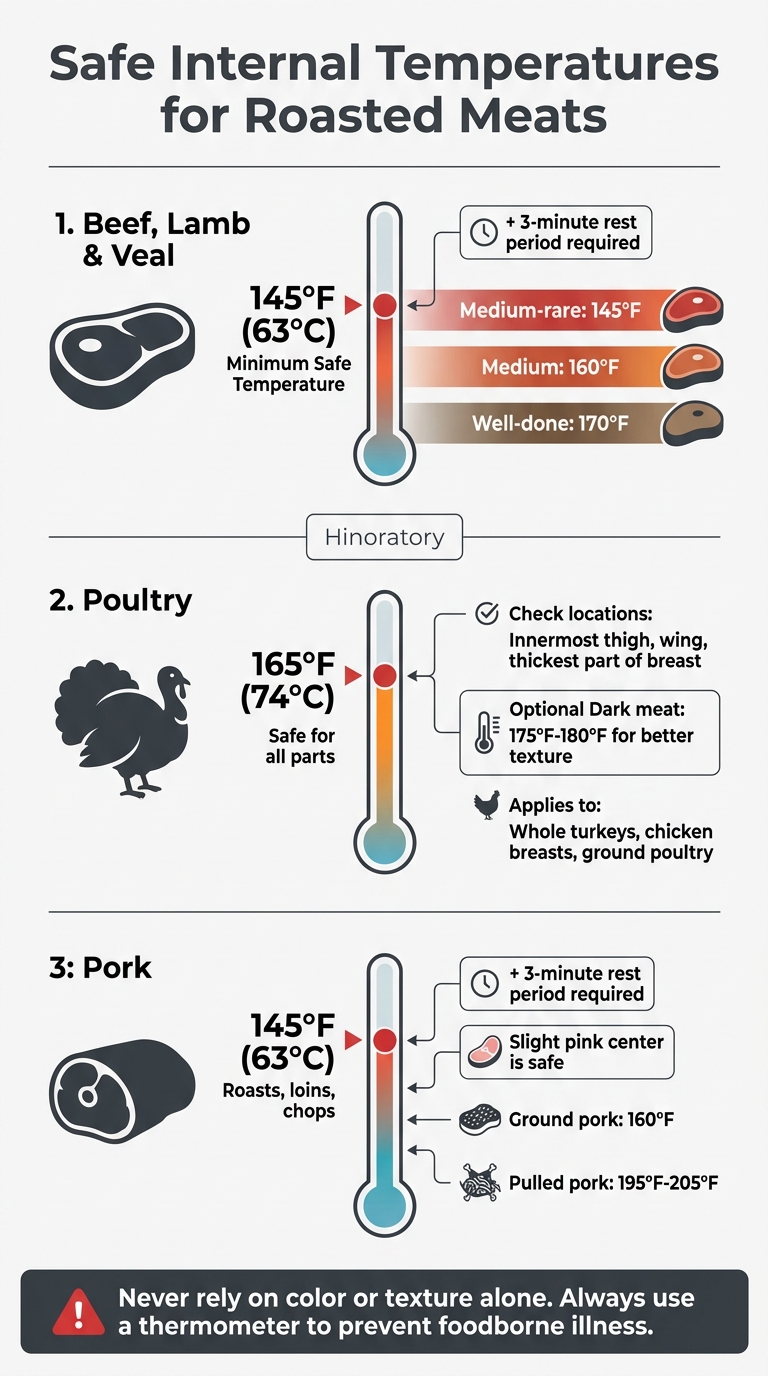
Safe Internal Temperatures for Roasted Meats
Safe Internal Cooking Temperatures for Roasted Meats Guide
Once you’ve nailed the fundamentals of cooking – like proper thermometer placement and calibration – it’s time to focus on the USDA-recommended temperatures to ensure your meat is safe to eat.
Using a thermometer is the only reliable method to confirm your roast is fully cooked and safe. Beverly Cazares, Communication Program Specialist at FSIS-USDA, explains:
USDA recommends never relying on color, firmness or time as an indicator to know if your food is fully cooked. Always cook all meats to a minimum safe internal temperature as measured with a food thermometer to prevent foodborne illness. [10]
Relying on visual cues, like the color of the meat or clear juices, can be misleading. Harmful bacteria like Salmonella or E. coli could still be present even when the meat looks done. To keep your meals safe, here are the minimum internal temperatures recommended for various types of roasted meats.
Beef, Lamb, and Veal
For whole cuts of beef, lamb, and veal, the USDA sets the safe minimum temperature at 145°F (63°C), followed by a required three-minute rest period. While this is the safety standard, preferences for doneness vary:
- Medium-rare: 145°F
- Medium: 160°F
- Well-done: 170°F
Regardless of your preferred level of doneness, the meat must not drop below 145°F to ensure safety.
Poultry
Poultry – including whole turkeys, chicken breasts, and ground poultry – must reach an internal temperature of 165°F (74°C). For whole birds, check the temperature in the innermost thigh, wing, and the thickest part of the breast.
For better texture in dark meat, you might want to cook it to 175°F–180°F, which helps break down collagen and improves tenderness.
Pork
For pork roasts, loins, and chops, the USDA recommends cooking to 145°F (63°C) with a three-minute rest period. Diane Van, Manager at the USDA Meat and Poultry Hotline, shares:
It’s just as safe to cook cuts of pork to 145 ºF with a three-minute rest time as it is to cook them to 160 ºF, the previously recommended temperature, with no rest time. [11]
At 145°F, a slight pink center is completely safe. For specific cuts:
- Roasts, loins, and chops: 145°F with a three-minute rest
- Pulled pork: Aim for 195°F–205°F for the perfect texture
- Ground pork: Must reach 160°F
Accurate temperature readings are essential – not just for safety, but also for achieving the best flavor and texture in every dish.
Common Mistakes and How to Fix Them
Even the most reliable thermometers can give inaccurate results if not used correctly. To ensure your roasts turn out perfectly, it’s important to recognize these common mistakes and learn how to fix them.
Incorrect Thermometer Placement
One of the biggest errors is placing the thermometer probe too close to bones, fat, or gristle. These areas can distort the temperature reading. Bones, for instance, conduct heat faster than meat, leading to a falsely high reading that might trick you into thinking your roast is ready when it’s still undercooked [12][2]. Reed Lalor, Vice President at ThermoPro, emphasizes:
Inserting the probe into a cold spot or hot spot can result in improperly cooked food. [2]
For thin cuts, like steaks or pork chops, it’s better to insert the probe from the side to ensure the sensor hits the center of the meat [12].
Stabilizing Fluctuating Readings
Temperature readings that jump around can often be blamed on removing the probe too quickly. Digital instant-read thermometers need 5 to 10 seconds to provide an accurate reading [12]. According to The MeatStick:
If you remove the thermometer too soon, you may get a reading that’s too low or too high, leading you to under- or overcook the meat based on faulty information. [12]
Another common culprit is a dirty probe. Grease or leftover food from previous use can interfere with the sensor. To fix this, clean the probe with a damp, soapy cloth or an antibacterial wipe between uses. If the readings are still inconsistent, recalibrate the thermometer. Use the ice point test: submerge the probe in ice water for 30 seconds – it should read 32°F. If it doesn’t, follow the recalibration steps outlined in the calibration section [8][13].
Choosing the Wrong Thermometer Type
Using the wrong type of thermometer can also lead to issues. For instance, relying on an instant-read thermometer for a long roast means repeatedly opening the oven door, which disrupts the cooking process and causes heat loss [12]. Instead, opt for a leave-in or wireless thermometer for roasts. These allow you to monitor the temperature continuously without interrupting the cooking. On the other hand, instant-read thermometers are ideal for quick checks on smaller cuts like steaks or chops. Matching the thermometer to your cooking method is key to avoiding unnecessary mistakes.
Conclusion
Using a meat thermometer properly can transform a dry, overcooked roast into a juicy, perfectly cooked dish. Relying on color or texture alone isn’t enough – the USDA emphasizes that a thermometer is the only reliable way to ensure harmful bacteria are eliminated [2]. As Melissa Kravitz Hoeffner, a recipe developer and writer, explains:
Using a meat thermometer correctly is the key to perfectly seared steaks cooked to temp, juicy whole roast chickens and turkeys, and even burgers with the red or brown center you desire. [2]
This insight underscores why accuracy in temperature readings is essential for every roast. Proper probe placement and regular checks help achieve both safety and the ideal level of doneness. Don’t forget to account for carryover cooking – remove your roast 5–10°F before it hits the target temperature, allowing it to finish cooking as it rests [2][14].
Beyond ensuring safety and flavor, a thermometer can also be a valuable learning tool. Reed Lalor, Vice President at ThermoPro, points out:
Meat thermometers are a great help when cooking a new type of meat or food you’ve never cooked before. [2]
Whether you’re experimenting with a new recipe or preparing a feast for a crowd, a meat thermometer takes the guesswork out of cooking, giving you the confidence to serve dishes cooked to perfection.
FAQs
Where is the best spot to place the probe in a roast?
When using a meat probe, insert it into the thickest part of the meat, steering clear of any bones, fat, or gristle. For bigger cuts like roasts or briskets, position the probe right in the center. This helps you get an accurate reading of the internal temperature, ensuring the meat is cooked properly and safely.
Why should I pull meat 5°F before the target temp?
Pulling meat about 5°F below your target temperature is a smart move because of something called carryover cooking. After you take the meat off the heat, the internal temperature continues to rise as it rests, thanks to residual heat. This little trick helps you hit your ideal doneness without accidentally overcooking. Plus, it keeps the meat juicy and tender, giving you that perfect bite every time.
How do I know if my thermometer is still accurate?
To ensure your meat thermometer is working correctly, try the boiling water and ice water test. At sea level, the thermometer should show 212°F in boiling water and 32°F in ice water. If the readings are way off, it might be time to recalibrate or replace your thermometer. This quick check helps guarantee accurate readings for perfectly cooked meat every time.