
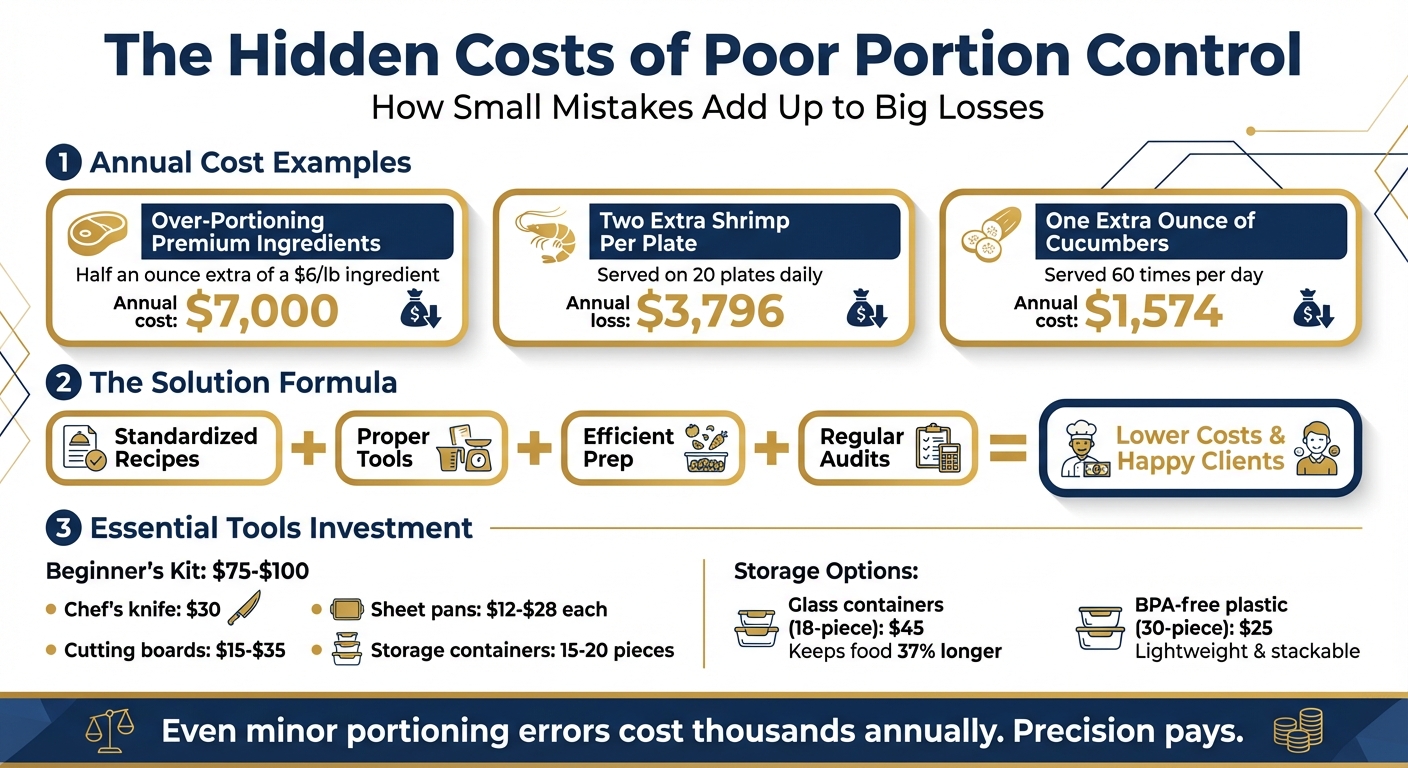
Portion control isn’t just about saving money – it’s about consistency, reducing waste, and meeting client expectations. As a private chef, even minor missteps in portioning can lead to significant costs over time. For example, over-portioning a $6-per-pound ingredient by just half an ounce can cost nearly $7,000 annually. Beyond finances, portion control ensures predictable food costs, reduces waste, and enhances the dining experience.
Key takeaways:
- Standardized recipes: Use precise measurements, weigh ingredients after cooking, and scale recipes carefully.
- Portioning tools: Invest in digital scales, measuring cups, and storage containers for accuracy.
- Efficient prep: Pre-portion ingredients, batch cook, and vacuum-seal for consistency and reduced waste.
- Regular audits: Check portion sizes, track waste, and adjust recipes based on client feedback.
The True Cost of Poor Portion Control for Private Chefs
How To Portion Out Your Recipes and Create Serving Sizes
Developing Standardized Recipes
A standardized recipe guarantees that every dish delivers the same flavor and portion size, no matter when it’s prepared. This reliability ensures that your client’s favorite meal tastes just as they remember it, whether they enjoy it today or months from now. As Beth Egan, a registered dietitian and author, explains:
S.A.M.E. – Standardization Always Meets Expectations [2].
Crafting Recipes with Precise Measurements
Every standardized recipe should include these seven essential components:
- Menu item name
- Total yield (number of servings)
- Specific portion size (measured by weight or volume)
- Exact ingredient quantities
- Step-by-step preparation instructions
- Cooking temperatures and times
- Plating directions
When measuring ingredients, use weight rather than volume, as factors like density and moisture content can vary. The only exception is water, which reliably converts at 1 cup to 8 ounces. After drafting the recipe, test it to confirm its accuracy. For expensive ingredients like salmon or beef tenderloin, conduct yield tests after trimming and cooking to ensure accurate portion counts and avoid running short.
Tailoring Recipes to Client Needs
Scaling recipes for different group sizes requires careful adjustments. Use the conversion factor method: divide the desired yield by the original recipe yield to calculate a multiplier for all ingredients. For instance, if a recipe serves 4 and you need to serve 12, the conversion factor is 3. Before applying this multiplier, convert dry ingredients from volume to weight for better accuracy.
Keep in mind that spices and seasonings don’t always scale proportionally. It’s best to season lightly at first and adjust to taste as needed. If clients have specific requirements – like low-sodium or gluten-free options – document these changes in a "variations" section. This way, the core recipe remains intact while accommodating individual preferences [2][3][4].
Up next: how to use precise portioning tools to maintain consistency.
Using Portion Control Tools
Take the guesswork out of portioning by using the right tools. Digital kitchen scales are a must-have – they give precise measurements for proteins, grains, and vegetables, ensuring every serving aligns with your standardized recipe. For dishes prepared in bulk, simply weigh the entire dish and divide the total weight by the number of servings to calculate individual portions [1]. Don’t forget to use the "tare" function on your scale to zero out the weight of your container, so you’re only measuring the food [1].
Traditional tools also play a crucial role in achieving accuracy. Measuring cups and spoons are indispensable when working with volume-based ingredients during recipe creation [6]. Additionally, 3-compartment containers are great for visually separating proteins, grains, and vegetables into pre-measured sections, making portioning even easier [5].
Basic Tools for Portioning
Starting with the right tools doesn’t have to break the bank. A beginner’s kit, costing around $75–$100, should include essentials like:
- A chef’s knife ($30)
- Cutting boards ($15–$35)
- Sheet pans ($12–$28 each)
- 15–20 storage containers [5]
When it comes to storage, glass containers are a smart choice. An 18-piece set costs about $45 and keeps food fresh 37% longer than plastic while avoiding odors and stains [5]. On the other hand, BPA-free plastic sets, priced around $25 for 30 pieces, are lightweight, stackable, and practical for everyday use. Whichever you choose, always label your containers with the meal name, prep date, and use-by date to stay organized and reduce waste [5].
Using Visual Aids
If tools like scales or measuring cups aren’t available, visual methods can help maintain portion consistency. Derek Howes, known as The Protein Chef, suggests the "Eye Method":
To use the eye method you would line up whatever you’re going to store your servings in and portion out your recipe to eye level [1].
This approach works well for dividing solid items like brownies or casseroles into even portions using visual templates [1].
The hand method is another practical option, especially for clients on the go. Here’s how it works:
- A palm equals 3–6 oz of protein
- A fist represents 1/2–1 cup of vegetables
- A cupped hand measures 1/2–1 cup of carbohydrates
- A thumb indicates 1 oz or 1 tablespoon of healthy fats [7]
Teaching this method allows clients to manage portions confidently, even when you’re not there to guide them. For added convenience, printable cheat sheets listing standard serving sizes for common foods can serve as handy references during meal prep [6].
sbb-itb-7261261
Implementing Efficient Prep Strategies
Getting ahead with preparation can save time, reduce waste, and ensure every dish meets the same high standard. One effective approach is to pre-portion ingredients before service begins. This not only removes the stress of last-minute decisions but also ensures accuracy and consistency in servings.
Pre-Portion Ingredients Ahead of Time
Measuring ingredients after cooking gives you the most precise portions. Since proteins and vegetables shrink during cooking, pre-cooking measurements often don’t match what ends up on the plate. A simple trick? Weigh the entire cooked dish using the tare function on your kitchen scale, then divide by the number of servings. For instance, if your cooked chicken dish weighs 2,000 grams, you can divide it into five 400-gram portions for perfect consistency every time [1].
Standardized prep sheets are another game-changer. These sheets outline exact quantities, preparation steps, and storage instructions, so you’re not left guessing during the rush of service. By sticking to these guidelines, you can avoid preparing too much and contributing to the staggering one-third of food waste that happens in households [6].
Once your portions are set, batch cooking can take your efficiency to the next level.
Batch Cooking and Portioning
Batch cooking works best with versatile staples like stocks, sauces, braised meats, and soups. These items can be prepared in bulk and portioned out for multiple services [8]. To make this process even smoother, consider setting aside specific times for production – like Tuesday afternoons for sauces or Wednesday mornings for proteins. This way, you’re not disrupting your daily workflow [8].
To keep your portions fresh and ready to go, vacuum-seal them as soon as they’re prepared. Vacuum-sealed portions not only extend shelf life but also eliminate any guesswork when things get hectic during service [6][8]. By combining batch cooking with precise portioning, you can maintain a seamless kitchen operation while cutting down on waste.
Conducting Regular Portion Audits
Once you’ve nailed efficient prep strategies, the next step is keeping portion sizes in check with regular audits. Why? Because even the most precise prep plans can’t guarantee consistency forever. Portion sizes tend to drift without oversight, and those small inconsistencies can add up to big costs. For instance, serving just two extra shrimp on 20 plates daily could result in a $3,796 annual loss. Or consider this: one extra ounce of cucumbers served 60 times a day adds up to $1,574 a year! [9].
A portion audit checklist is your best friend here. It helps you spot and fix those tiny errors before they snowball into expensive problems.
Tracking Portion Sizes and Waste
Start with a simple portion audit form. This should include three key columns:
- Edible portion: What actually ends up on the plate.
- As-purchased cost: What you paid your vendor for the ingredient.
- Edible portion cost: The true cost after accounting for trimming and cooking waste.
This form gives you a clear view of whether your portion sizes or selling prices need tweaking.
Next, perform random plate checks. Weigh the components on a plate and compare them to your master portion checklist. Keep a log of any waste from served items. If you notice you’re consistently throwing out the same ingredients, it’s a sign the portions might be too big.
Returned plates are another goldmine of information. If certain dishes frequently come back unfinished, it’s time to scale down those portions. On the flip side, if complaints about small servings are piling up, you might need to bump up the sizes. As Sourcery aptly puts it, "If each plate that goes out of a kitchen is portioned differently, it becomes impossible to calculate profit margins and keep tabs on expenses" [9]. Consistency is crucial for maintaining control over profits and costs.
Finally, don’t just rely on the numbers – integrate client feedback into your findings to fine-tune portion sizes further.
Using Client Feedback
Your diners are a valuable resource when it comes to perfecting portion sizes. A quick conversation about meal portions can provide insights you might not catch otherwise. This helps you strike the right balance: portions that offer great value to customers without cutting into your bottom line.
For example, if a client regularly mentions they can’t finish the roasted vegetables but always ask for extra protein, that’s a clear signal to adjust your ratios. Update your recipes and prep guides based on this feedback so the changes become part of your standard process. By aligning portions with customer preferences, you ensure satisfaction while keeping costs under control.
Conclusion
Key Takeaways
Mastering portion control is the backbone of a well-organized kitchen. Start with standardized recipes that rely on precise measurements – using a digital kitchen scale set to grams makes calculations much simpler. Keep in mind that cooking alters weight, so it’s essential to reweigh portions after cooking to prevent overspending.
Your tools – scales, measuring cups, ladles, and scoops – are your allies in maintaining consistency. Pair them with smart prep techniques like batch cooking and pre-portioning ingredients. To fine-tune your system, conduct regular audits: track portion sizes, monitor waste, and listen to client feedback. Even small adjustments can lead to noticeable cost savings.
Here’s the formula in a nutshell: standardized recipes + proper tools + efficient prep + regular audits = lower costs and happier clients.
Next Steps for Continuous Improvement
Use these insights as a foundation to keep improving. Portion control gets better with practice and ongoing learning. Stay up-to-date with industry trends, experiment with new techniques in your kitchen, and revise your recipes promptly whenever changes are made.
If you’re eager to elevate your operational skills, consider specialized training that focuses on profitability and efficiency. Park City Culinary Institute offers a 5-week Culinary Operations Management Program designed to help chefs optimize their kitchens for modern demands. With both online and on-campus options, you can enhance your expertise without interrupting your career. Visit Park City Culinary Institute to find programs that align with your schedule and goals.
FAQs
How do I scale recipes accurately for different group sizes?
Scaling recipes correctly is all about using a conversion factor and applying it to every ingredient in the recipe. Here’s how it works: figure out the original recipe’s yield and compare it to the number of servings you need. To find your conversion factor, divide the desired servings by the original yield. For example, if the recipe makes 6 servings and you need 12, your conversion factor is 2.0.
Once you have the factor, multiply each ingredient by it. Stick to U.S. measurements like cups, teaspoons, or ounces. For example, 1 ½ cups of broth doubles to 3 cups, and 4 ounces of cheese becomes 8 ounces. Be practical when adjusting measurements – round to amounts like ¼ cup or ½ teaspoon when needed. Also, keep in mind that scaling up might impact the cooking process. Larger batches can sometimes require tweaks to cooking times or temperatures to ensure everything cooks evenly.
Don’t forget to write down your scaled recipe. Include the updated ingredient amounts, the new yield, and any changes to the cooking method. Having this on hand makes it easier to recreate the recipe and ensures consistent results every time.
What tools do private chefs need for accurate portion control?
Accurate portion control starts with having the right tools. A digital kitchen scale is a must-have for getting precise measurements, whether you’re weighing a pinch of herbs or a few pounds of protein. Pair it with measuring cups and spoons to handle both dry and liquid ingredients, ensuring you stick to recipes without guesswork. Tools like portion scoops, ladles, and dippers with marked capacities make it easy to serve soups, sauces, or larger items consistently.
For plating, portion-control plates or dividers can help you serve consistent amounts of proteins, vegetables, and starches. If a scale isn’t handy, visual aids like portion-size guides or hand-measurement tricks (like using your palm for protein or your fist for veggies) are practical alternatives.
Private chefs looking to sharpen their portioning skills can benefit from hands-on training at Park City Culinary Institute, where precision, reducing waste, and making the most of ingredients are key focuses. Armed with the right tools and techniques, chefs can consistently create high-quality dishes while keeping food costs under control.
How does client feedback help private chefs improve portion control?
Client feedback plays a key role in refining portion sizes. When clients share comments like "the portions were too large" or "too small", it gives private chefs the chance to fine-tune servings to match expectations. This not only improves the dining experience but also helps cut down on food waste and keeps ingredient costs in check.
To use feedback effectively, private chefs can keep track of client comments after each service and compare them with their portioning standards. This approach makes it easier to adjust recipes or serving sizes, ensuring meals are consistent and satisfying. At Park City Culinary Institute, chefs are trained to seamlessly incorporate client feedback into their process, crafting meals that strike the perfect balance between cost management and guest satisfaction.