
Sautéing is a fast cooking method that uses high heat and a small amount of fat to create a golden crust on food. But the same high heat that makes sautéing effective can also lead to burned food if you’re not careful. Here’s how you can avoid burning food while sautéing:
- Preheat Your Pan Properly: A hot pan ensures even cooking. Use the water drop test to check if your pan is ready before adding oil or food.
- Choose the Right Oil: Use oils with high smoke points like refined avocado oil (520°F) or canola oil (400°F). Avoid low smoke-point oils like extra virgin olive oil.
- Control Heat Levels: Keep the temperature between 320°F and 350°F to achieve browning without burning.
- Prep Ingredients Correctly: Cut food evenly for consistent cooking, and dry ingredients thoroughly to prevent steaming.
- Avoid Overcrowding: Cook in small batches to maintain high heat and allow proper browning.
- Stay Attentive: Keep food moving in the pan and watch for visual and aromatic cues to prevent overcooking.
How to Sauté Vegetables without burning them! #shorts
Heat and Temperature Control
Mastering heat control is essential to prevent burning and achieve perfectly sautéed dishes. By learning how to preheat your pan and maintain the right cooking temperature, you can elevate your results. It all starts with creating the ideal cooking environment through proper preheating.
Why You Should Preheat Your Pan
Preheating your pan is a crucial step to avoid burning and ensure even cooking. If you add food to a cold pan, it can lead to steaming and sogginess instead of that desirable golden-brown crust. Here’s why: water turns to steam at 212°F [6], so a cold pan won’t evaporate moisture quickly. Instead, the water pools around the food, lowering the pan’s temperature even further. For stainless steel pans, preheating also helps reduce sticking.
To check if your pan is preheated, try the water drop test. Sprinkle a few drops of water into the dry pan. If they evaporate instantly or bead up and dance around (thanks to the Leidenfrost effect) [3], your pan has reached approximately 212°F and is ready for cooking. Preheat your pan for two to three minutes before adding oil or food for the best results.
Finding the Right Heat Level
Once your pan is preheated, adjusting the heat properly is key to achieving a perfect sauté. Aim for a cooking temperature between 320°F and 350°F. This range allows for browning through the Maillard reaction without burning the food. Typically, medium to medium-high heat works well to maintain this temperature. Remember, keeping the pan above 165°F is essential, as this is where proteins coagulate and cooking begins [6].
"The caramelization of sugars may not always be the goal, so the pan needn’t be 320°F all the time… However, you always want to ensure the pan is above 165°F, where proteins coagulate and cooking begins" [6].
After adding oil, look for visual cues. When the oil shimmers or develops fine ripples, it’s hot enough to cook but hasn’t reached its smoke point yet.
"Oil will begin a convection process before smoking, going from perfectly smooth in the pan to striated, getting ripples" [6].
If you’re using butter, wait until it stops foaming and starts turning a pale brown color. These visual and auditory signals – like shimmering oil and a steady sizzle – indicate the pan is at the right temperature. No sound means the pan is too cold, while excessive sizzling or smoke signals that the oil is overheated. Adjusting the heat is much easier than trying to recover once the food begins steaming.
Here’s a quick guide for preheating based on pan material:
| Pan Material | Heat Level | Preheating Method |
|---|---|---|
| Stainless Steel | Medium-High | Preheat dry for 2–3 minutes, then add oil |
| Cast Iron | Medium-High | Preheat thoroughly (it retains heat exceptionally well) |
| Nonstick | Medium or Lower | Add oil before heating to protect the coating |
Choosing Your Oil and Cookware
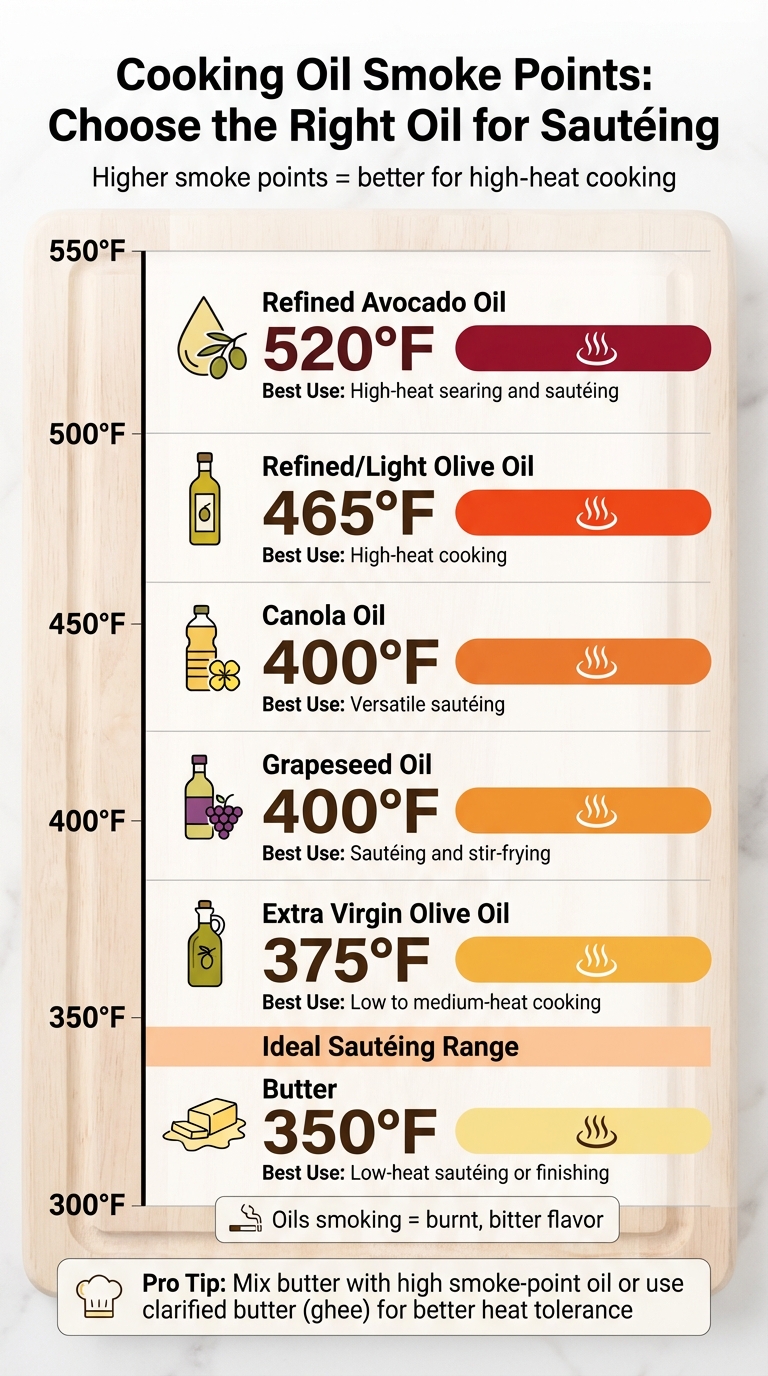
Cooking Oil Smoke Points Guide for Sautéing
The type of oil and pan you use can make or break your sautéing efforts. The right combination ensures your food browns evenly without burning. To get it right, you need to understand how oil smoke points and cookware materials affect the cooking process.
Oil Smoke Points Explained
Preventing burnt flavors starts with choosing an oil that can handle the heat. Every oil has a smoke point – the temperature at which it begins to smoke, break down, and release acrolein, a compound that gives food an unpleasant burnt, bitter taste [7][10]. Selecting the right oil for your cooking temperature is essential.
Refined oils are your best bet for sautéing, as they can withstand higher temperatures. For instance:
- Refined avocado oil: With a smoke point of 520°F, it’s perfect for high-heat cooking like searing [7].
- Canola and grapeseed oils: Both have smoke points of around 400°F, making them versatile options for medium to high heat.
- Refined or light olive oil: At 465°F, it’s a better choice for sautéing compared to extra virgin olive oil, which has a lower smoke point of 375°F [7].
"When an oil starts to smoke it will impart a burnt, bitter flavor thanks to a substance released called acrolein." – Michelin Guide [10]
Butter, with its rich flavor, has a low smoke point of 350°F, which makes it tricky to use for sautéing [7]. To avoid burning, you can mix butter with a higher smoke-point oil or opt for clarified butter (ghee), which has the milk solids removed and can handle higher temperatures [8].
| Oil Type | Smoke Point | Best Use |
|---|---|---|
| Refined Avocado Oil | 520°F | High-heat searing and sautéing |
| Refined/Light Olive Oil | 465°F | High-heat cooking |
| Canola Oil | 400°F | Versatile sautéing |
| Grapeseed Oil | 400°F | Sautéing and stir-frying |
| Extra Virgin Olive Oil | 375°F | Low to medium-heat cooking |
| Butter | 350°F | Low-heat sautéing or finishing |
Using the Right Pan
Once you’ve picked the right oil, the pan you use plays an equally important role in achieving consistent cooking. The material and size of your pan affect heat distribution and the quality of your sauté.
Heavy-bottomed pans made of stainless steel or cast iron are excellent for even heat distribution, helping you avoid hot spots that can cause burning. Thinner pans, on the other hand, may heat unevenly, leading to inconsistent results.
"The key is to select a sturdy, heavy pan that will cook evenly." – Wini Moranville, Food Writer [1]
The size of your pan also matters. A pan that’s too small will crowd your ingredients, causing them to steam instead of sauté. On the flip side, a pan that’s too large can leave too much exposed oil, increasing the risk of burning. For reference:
- An 8- or 10-inch pan is ideal for cooking for two.
- A 12-inch pan works better for larger portions.
When choosing between a sauté pan and a skillet, remember their differences. A true sauté pan has straight, high sides to keep food contained during stirring, while a skillet’s flared sides are better for flipping ingredients.
Stainless steel pans are fantastic for browning and creating fond – the flavorful browned bits that are perfect for making pan sauces. They’re great for meats and hearty vegetables. Non-stick pans, however, are better suited for delicate foods like spinach but may not brown food as effectively [8][9]. Pairing the right cookware with the proper heat and oil ensures your sautéing is a success.
Preparing Your Ingredients
Once you’ve chosen the right pan and oil, prepping your ingredients becomes the next crucial step. Proper preparation not only prevents burning but also ensures even cooking and a beautifully seared finish. How you handle your ingredients can make all the difference in achieving that perfect balance of flavor and texture.
Cut Ingredients to the Same Size
Unevenly sized pieces cook at different rates. Smaller bits finish faster, often burning before larger pieces are fully cooked. For example, denser vegetables like carrots should be cut smaller than lighter ones like mushrooms to ensure everything cooks evenly.
"Cut all your vegetables into uniform small diced or julienned pieces so they can cook evenly as a group." – Omid Roustaei, Culinary Instructor [4]
If you’re cooking a mix of vegetables, start with the denser ones – like carrots or potatoes – and add the lighter ones, such as zucchini or peppers, later in the process. This staggered approach ensures every piece reaches the perfect doneness without overcooking the more delicate ingredients.
Once you’ve achieved uniform cuts, the next step is to eliminate any surface moisture for optimal results.
Dry Your Ingredients First
Sautéing thrives on dry heat, and excess moisture can ruin the process. Wet ingredients create steam, which not only prevents proper browning but also leads to uneven cooking.
Before anything hits the pan, make sure your proteins and vegetables are thoroughly dry. Use paper towels to pat them down, or if you’ve washed your vegetables, allow them to air-dry completely. A salad spinner is another handy tool to quickly remove excess water.
"Sautéing is a dry cooking method, which means it works best without any additional liquid getting in the way of proper searing and browning." – Omid Roustaei, Culinary Instructor [4]
Moisture not only results in soggy textures but can also cause the pan’s temperature to drop, leading to sticking and uneven searing. With dry ingredients ready to go, it’s time to think about when to add your seasonings for maximum flavor.
When to Add Seasoning
Timing is everything when it comes to seasoning. While salt and pepper can be added early to enhance flavor, dried herbs and spices require a bit more care. Add them too soon, and they may burn, leaving a bitter taste. Instead, sprinkle them in when your ingredients are about halfway cooked [2].
Garlic, in particular, is quick to cook and can easily burn, turning bitter. The best approach? Add it when your other ingredients are almost done – about 95% cooked. Just 30 to 60 seconds is enough for garlic to release its aroma and flavor without overcooking [2].
"When adding garlic to a sauté, always add it when the vegetables are about 95% cooked. The garlic only takes about 30 seconds to a minute to reach its potential and cook through." – The Chopping Block [2]
For fresh herbs, timing is even more delicate. They’re best added at the very end of cooking to preserve their bright flavor and vibrant color. Similarly, finishing touches like a squeeze of lemon juice or a pat of butter should be added right before serving to enhance flavor without risking scorching.
sbb-itb-7261261
How to Sauté Without Burning
Mastering sautéing without burning food involves proper heat management, ingredient preparation, and a few essential techniques. With your ingredients ready, the key to success lies in keeping everything in motion and maintaining the right conditions in the pan.
Keep Your Food Moving
Movement is essential when sautéing. By keeping the food in constant motion, you ensure that every surface gets even exposure to heat, preventing any one side from burning. If food sits still, the bottom heats up too quickly while the top stays cooler, creating an imbalance that can lead to scorching.
"The reason it’s important to keep the food moving around is that when a hot thing meets a cooler thing, their temperatures eventually meet in the middle. The cooler thing grows warmer while the hot thing cools down." – Danilo Alfaro, Culinary Expert
Stirring also helps address hot spots in the pan, ensuring that everything cooks evenly no matter where it lands. If flipping the pan feels tricky, use a wooden spoon or a heatproof spatula to keep things moving. Aim for a single layer of food and steady motion to ensure even cooking and to prevent temperature drops.
Don’t Overcrowd the Pan
While constant movement is crucial, overcrowding the pan can disrupt the sautéing process. Adding too much food lowers the pan’s temperature, which stops the browning process and can lead to steaming instead. When food piles up, only the bottom layer touches the heat, while the rest sits in moisture, resulting in soggy, unevenly cooked ingredients.
"Too much food in the pan dissipates the heat, causing the food to steam or boil rather than sauté." – Danilo Alfaro, Culinary Expert
To avoid this, keep your ingredients in a single layer, leaving some of the pan’s surface visible. If you’re cooking a large quantity, work in smaller batches or use multiple pans to maintain the high heat needed for proper sautéing.
Watch and Smell Your Food
Sautéing happens fast, so staying attentive is non-negotiable. Keep an eye on the food as it transitions to a light golden brown. When caramelization is done correctly, the food will release easily from the pan.
"Sautéing and multitasking don’t mix well. Unlike the watched pot that never boils, sautéed vegetables and meats are done in a flash." – Wini Moranville, Food Writer
Your nose is just as important as your eyes. A sweet, nutty aroma signals that sugars and amino acids are reacting to the heat properly. If you detect a sharp, burnt smell or notice the food browning too quickly, lower the heat to medium or medium-low immediately. Vegetables should be crisp-tender – soft enough to pierce with a fork but still retaining a satisfying crunch.
Fixing Common Sautéing Problems
Even seasoned cooks can run into hiccups when sautéing, but recognizing and addressing these issues quickly can save your dish. Here are some practical solutions for common problems you might encounter.
When Your Pan Gets Too Hot or Too Cold
Managing the pan’s temperature is crucial. If the pan overheats, remove it from the burner right away and lower the heat to medium-low. If the oil starts to smoke, it’s best to discard it and start fresh with a cooler pan.
"If your oil does begin to smoke, don’t worry: Simply remove it from the heat, pour out the oil into a heat-proof (glass or ceramic) container, turn down the heat, and start again." – The Kitchn Editors, The Kitchn [9]
If the pan cools down too much – often caused by overcrowding – remove some of the food and cook in smaller batches. This helps maintain the right temperature for even cooking. If the pan starts to look dry, add a little more oil to ensure even heat distribution and to prevent scorching [2][5][11].
What to Do If Food Starts Burning
Burning food happens to the best of us. If you notice food browning too quickly, immediately lower the heat. Adding 2–3 tablespoons of water, wine, or stock can help cool the pan and loosen the flavorful browned bits, known as fond, from the bottom.
"If your food starts to caramelize too quickly or your pan starts to burn before your food is cooked through, adding a few tablespoons of water or just enough to barely coat the bottom of the pan will help cool it down, clean it off and transfer more flavor to your food." – The Chopping Block [2]
Scrape up these browned bits to incorporate their flavor into your dish, but avoid any blackened, charred pieces as they can taste bitter. This deglazing technique not only halts further burning but also sets the stage for a quick and flavorful pan sauce.
Handling Excess Moisture
Excess moisture can turn your sauté into a steaming session, which prevents proper browning and leads to uneven cooking. To avoid this, always pat your ingredients dry before adding them to the pan [12][5]. If liquid starts pooling during cooking, slightly increase the heat to encourage evaporation or carefully drain the excess.
"A shallow pan makes it easier for excess moisture to evaporate away during cooking. Too much moisture will cause the excess liquid to pool in the bottom of the pan, so your food will end up stewing in its own juices instead of sautéing." – Tasting Table [5]
Keep the pan uncovered to allow steam to escape. For watery vegetables like zucchini or tomatoes, add them toward the end of cooking to prevent them from releasing too much liquid and cooling the pan. This ensures your dish achieves that golden, crisp texture you’re aiming for.
Conclusion
To master sautéing, focus on these key principles: preheat your pan thoroughly, use oils with a high smoke point, keep ingredients moving, and avoid overcrowding. These steps are the foundation of a successful sauté.
"Learning how to sauté properly can elevate your cooking from good to great, making it an essential skill in every home chef’s repertoire." – Misen [3]
Sautéing is a core cooking technique that improves with practice. Start with simple vegetables like bell peppers or zucchini to get the hang of it, then progress to proteins and more delicate aromatics. With time, these techniques will become second nature and serve as a stepping stone to more advanced culinary skills.
For those looking to take their skills to the next level, hands-on training can make a big difference. The Park City Culinary Institute offers professional programs in Cuisine (5–8 weeks), Pastry & Baking (5–8 weeks), and Culinary Arts (10–16 weeks). These courses cover everything from knife skills to sauce-making and have produced notable alumni like Jonathan Clark, owner of Kodiak Cakes, and the founders of Crumbl Cookies, who went on to build nationally recognized brands [13].
The more you practice, the more confident and skilled you’ll become, ensuring perfectly sautéed dishes every time.
FAQs
How can I tell if my pan is properly preheated for sautéing?
Making sure your pan is preheated correctly is the secret to avoiding burnt or unevenly cooked food when sautéing. Here are a few simple ways to tell if your pan is ready:
- Water test: Sprinkle a few drops of water onto the pan. If the water droplets sizzle and skitter across the surface before evaporating, the pan is hot enough.
- Shimmering oil: Pour a small amount of oil into the pan. It should spread out quickly into a thin, shiny layer. If the oil pools or moves sluggishly, the pan needs more time to heat up.
- Light smoke: When the oil begins to release a faint wisp of smoke, it’s reached the ideal temperature for sautéing.
Another reliable method? Touch a small piece of food to the pan. If it sizzles right away without sticking, you’re good to go! These tips, along with hands-on heat control techniques, are part of what students learn at Park City Culinary Institute’s cooking classes.
How can I keep garlic from burning when sautéing?
To keep garlic from burning while sautéing, it’s all about managing heat and timing. Begin by warming your pan over medium heat, adding just enough oil or butter to create a thin, even coating on the surface. Since garlic cooks very quickly, it’s best to add it after other ingredients, like onions, have softened. The moisture released by the onions helps moderate the pan’s temperature, reducing the risk of burning.
When you do add the garlic, sauté it for only 30–60 seconds, stirring constantly. You’re looking for that moment when it becomes fragrant and turns a light golden color. If it starts to brown too fast, lower the heat immediately. To halt further cooking, introduce a liquid ingredient – such as broth or tomatoes – right after sautéing the garlic. This not only prevents burning but also enhances the dish’s flavor.
Want to refine your skills? A cooking class at Park City Culinary Institute offers hands-on experience with expert chefs, helping you master techniques like this. With these strategies, your garlic will come out perfectly golden and flavorful, never bitter or burnt.
What can I do if my food starts burning while sautéing?
If you notice your food starting to burn while sautéing, don’t panic – quick action can save your dish. Begin by turning down the heat or taking the pan off the burner entirely to halt the cooking process. Adding a small amount of oil or butter can help cool the pan slightly and provide a protective coating for the food. Make sure to stir or toss the ingredients constantly to distribute the heat more evenly and prevent them from sticking.
If the pan was overheated to begin with, give it a moment to cool down before continuing to cook at a lower temperature. Keeping an eye on the heat and regularly moving the food around will not only help you rescue your current meal but also reduce the chances of burning in the future.